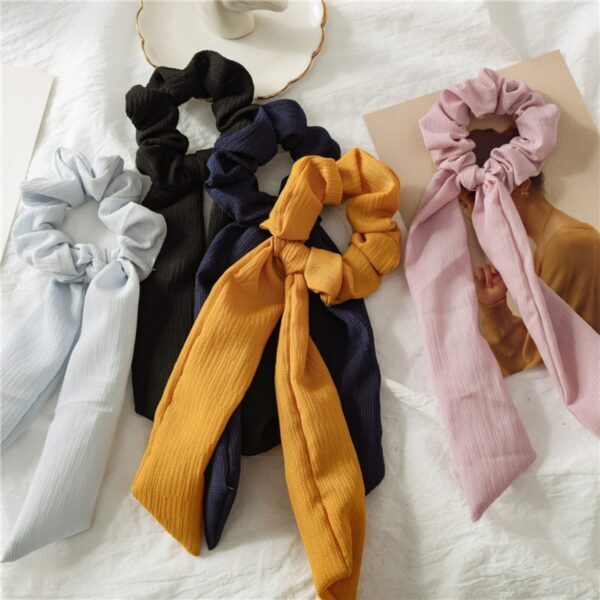
Ribbon hair ties have become a popular accessory, offering both functionality and style. They are adaptable, simple to produce, and let you give your hairstyles a unique touch. By crafting your own ribbon hair ties, you can experiment with an array of colors, patterns, and textures to perfectly match your outfits and express your unique fashion sense. This thorough guide will bring you through the procedure step-by-step of creating beautiful and fashionable ribbon hair ties. Whether you’re a beginner or an experienced crafter, this detailed tutorial will equip you with the knowledge and techniques to design your own collection of eye-catching hair accessories.
Gather Your Materials – How to Make Ribbon Hair Ties
Before diving into the creative process, it’s important to gather all the necessary materials. Here’s what you’ll need:
- Ribbons of your choice: Visit a local craft store or browse online to find ribbons that catch your eye. Consider various colors, patterns, widths, and materials such as satin, grosgrain, or velvet. This will enable you to produce various hair ties to suit various events.
- Hair ties: Look for elastic hair ties that match your ribbon choices. These hair ties will provide the foundation and functionality for your ribbon hair ties.
- Scissors: A good set of scissors is necessary for precise cutting. Make sure they are suitable for cutting ribbons and provide clean edges.
- Glue gun or fabric glue: You will need a reliable adhesive to protect the ribbon ends and prevent fraying. A glue gun or fabric glue is recommended for its strength and durability.
- Ruler: A ruler will facilitate the measurement of the desired length of your hair ties, ensuring consistency and accuracy throughout the crafting process.
- Lighter or clear nail polish: To cinch the ends of the ribbon and prevent unraveling, you can choose a lighter or clear nail polish. Both options are effective in providing a neat finish.
Measure and Cut the Ribbons
To begin, decide on the desired length of your ribbon hair ties. The standard length is typically between 8 and 10 inches, but feel free to adjust it based on personal preference and hair thickness.
Using a ruler, measure and mark the desired length on the ribbon. Ensure your marks are clear and evenly spaced. Once marked, carefully cut the ribbons along the lines using your scissors. Take your time to ensure straight and clean cuts, as they contribute to the overall polished appearance of the hair ties.
Seal the Ribbon Ends – How to Make Ribbon Hair Ties
To prevent fraying and ensure longevity, it’s crucial to seal the ends of the ribbons. This can be done in two ways:
- Using a lighter: Hold one end of the ribbon near the flame of a lighter for a brief moment, being careful not to burn the fabric. The heat will melt the edges slightly, creating a seal that prevents fraying. Repeat this process for each ribbon end.
- Using clear nail polish: Alternatively, you can apply a small amount of clear nail polish to the cut ends of the ribbon. The nail polish will dry transparently, effectively sealing the edges and preventing fraying. Before proceeding to the following step, let the nail paint completely dry.
Attach the Ribbon to the Hair Tie
Now comes the fun part—attaching the ribbon to the hair tie. This process ensures that the hair tie is concealed while the ribbon takes center stage. Follow these steps:
- Apply a small amount of glue to one end of the hair tie using a glue gun or fabric glue. Be careful not to use excessive amounts that could cause messy overflow.
- Press the ribbon firmly onto the glued section of the hair tie. Hold it in place for a few seconds, allowing the adhesive to set. Make sure the ribbon is centered and aligned with the hair tie.
- Slowly and carefully wrap the ribbon around the hair tie, ensuring it remains taut and smooth. As you wrap, add small amounts of glue along the length of the hair tie to secure the ribbon. Take your time to avoid any wrinkles or creases.
- Continue wrapping until you reach the opposite end of the hair tie. Trim off any excess ribbon, leaving a small overlap to ensure a secure attachment.
Secure the Ribbon End – How to Make Ribbon Hair Ties
To complete the attachment process, secure the ribbon end firmly in place. Follow these steps:
- Apply a small dab of glue to the ribbon’s end.
- Press the ribbon end firmly against the hair tie, holding it in place for a few seconds to allow the glue to set. This step ensures that the ribbon doesn’t unravel over time.
Finishing Touches
After attaching the ribbon and securing the ends, it’s time for the finishing touches to perfect your ribbon hair ties:
- Allow the glue to dry completely. This is crucial to ensure a strong bond between the ribbon and the hair tie.
- Once the glue is dry, inspect the hair tie for any loose ends or frayed edges. Use your scissors to trim any imperfections, creating a clean and professional appearance.
- For additional security and durability, you may choose to add a small drop of glue along the edges of the ribbon. This will help reinforce the ribbon’s attachment to the hair tie.
- To add variety to your collection, experiment with different ribbon colors, patterns, and textures. You can mix and match ribbons of varying widths, or even layer multiple ribbons for a more intricate look.
Conclusion
Making your ribbon hair ties gives you a chance to exhibit your creativity and uniqueness through fashionable accessories. By following this step-by-step guide, you have the knowledge and techniques to make personalized ribbon hair ties that perfectly complement your outfits and hairstyles. From choosing the ribbons to attaching them to the hair ties, each step contributes to the overall aesthetic appeal of your creations. So gather your materials, embrace your creativity, and enjoy the process of making your very own ribbon hair ties to enhance your everyday look.